We made a video over at Mastering Explained where I talk about loudness matching when mastering. I demonstrate how to use some available plugins for doing automated level matching. Have a look at the video for the full explanation.
The plugins demonstrated in the video are:
These are all really good plugins that solve a specific use case in an elegant way. For occasional reality checks when mixing or mastering they all work perfectly fine. But for more dedicated mastering work, they have a few problems:
- The plugins need to be within the processing chain itself, and thus have to be disabled before exporting the final master. This will lead to errors when you forget to bypass before rendering, which you inevitable will do at some point.
- The loudness matching is done by adjusting the loudness of the “after” signal, while keeping the “before” signal at a constant level. This is not a good solution from a mastering workflow perspective. To have a productive and predictable mastering workflow you need full control of the levels going into your monitoring system.
- The adjustment of the “after” signal is done continuously when using the automatic modes of the plugins, even while you are listening to the signal. This will change the dynamic content of the signal and make it harder to evaluate the sound.
Problems 1 and 2 can be solved by moving the plugins into the monitoring effect chain within Reaper, and do some creative routing. See the video for more details.
The third problem can’t really be solved as far as I can see, at least not while using the automatic modes of the plugins. It is less of a problem when it is the “before” signal that is constantly adjusted, but it would still be better if the gain would be held static while listening to the signal.
To solve all of these problems, I made some modifications to the AB Level Matching JSFX from TBProAudio.
The changes made to the original plugin are:
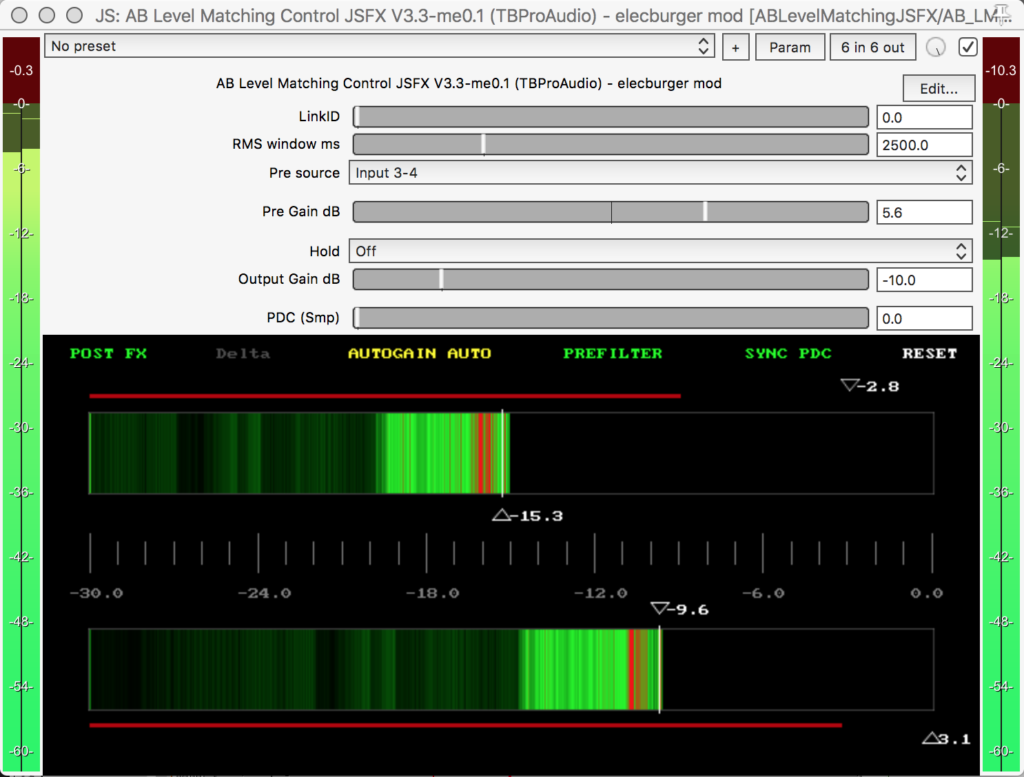
- Keep the “after” / “post” / mastered signal at a constant, unchanged level (except for the Output Gain, see below)
- Adjust the gain of the “before” / “pre” / original signal to match the loudness of the mastered signal
- Keep the gain constant while listening to the original signal (when “Autolevel Auto” mode is enabled, as it is by default)
- Add an option to take the “Pre” signal either from the source plugin (original behaviour) or from input 3-4 (the new default). This makes routing and usage simpler when having the plugin in the monitoring effect chain.
- Add a constant Output Gain control to avoid clipping of the compensated original signal. The default is -10 dB which is enough for most situations.
- Set the default RMS window to 2500 ms and have the ITU-R BS.1770-4 prefilter enabled as default.
- Remove / hide some parameters for a cleaner interface
This makes the plugin into a great tool for automated level matching within a mastering workflow.
Installation
The easiest way to use this plugin is to install the Mastering Starter Pack for Reaper, and this is the way I would recommend as well.
If you want to install it manually, then follow the steps below:
- Download the AB Level Matching JSFX for Reaper from the TBProAudio website. Look for “AB LM JSFX” under “Reaper JSFX Plugins”. You will need this for the modified version to work.
- Download the modified controller plugin here.
- Unzip both downloaded files and move the “AB_LM_ME_cntrl” file to the “ABLevelMatchingJSFX” directory.
- Open the Reaper resource directory. You can find it from within Reaper by going to “Options” -> “Show REAPER resource path in explorer/finder…”
- Move or copy the “ABLevelMatchingJSFX” directory into the “Effects” directory.
- Either scan for new plugins in Reaper, or close and restart Reaper.
Usage
See the video for a more detailed walk-through. But in short:
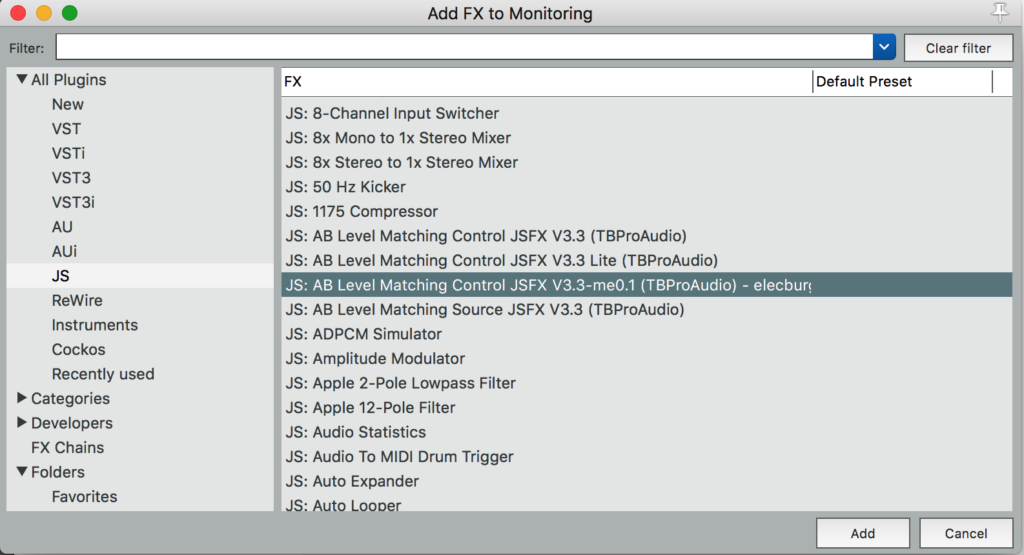
- Open the Monitoring FX plugin chain.
- Add the “AB Level Matching Control (TBProAudio) – ME Starter Pack mod” plugin. It will be found among the JS plugins.
- Make sure that the monitoring plugin chain has at least 4 channels in the Plug-in pin connector.
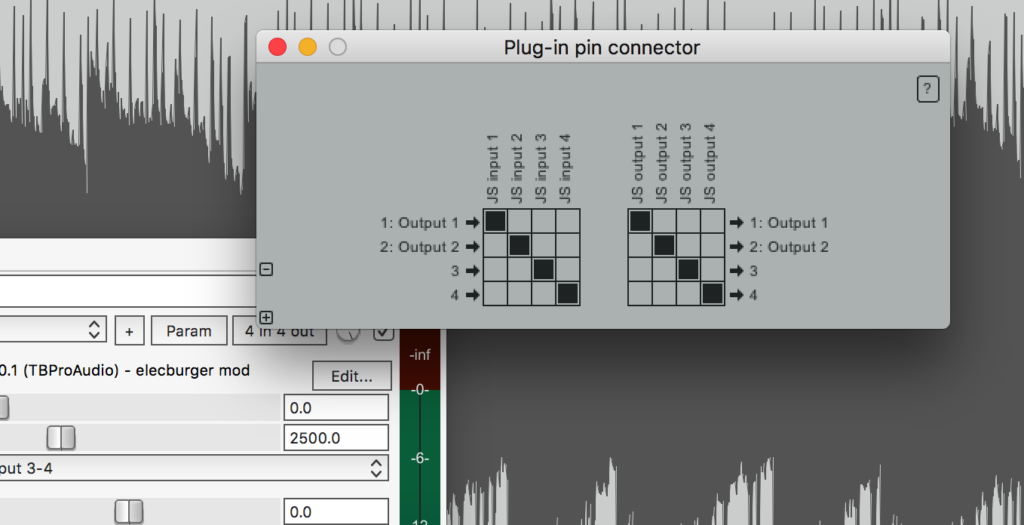
- Route the “Before” signal to channels 3-4 in the monitoring path. You can access all channels in the monitoring path as hardware outputs in the routing window for each track.
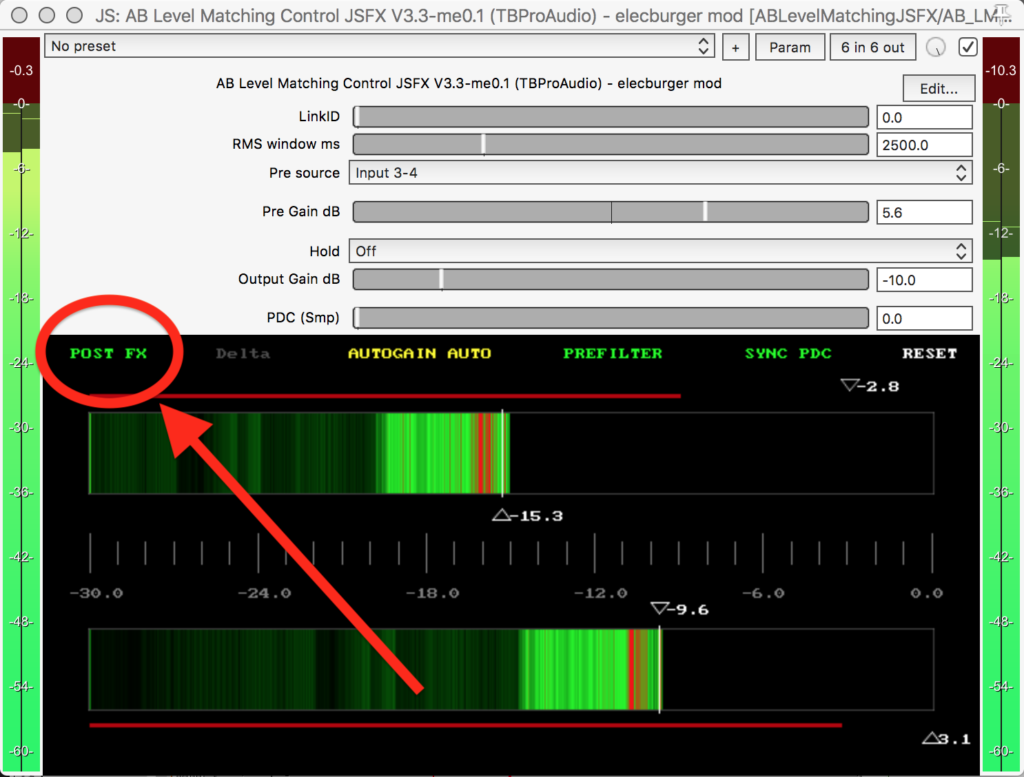
- Get started mastering and enjoy loudness matched before/after comparison by pressing “POST FX” in the GUI.
I hope you find this useful! Leave a comment below if you have any questions or suggestions!
Hi, I’m not sure what I’m doing wrong,m
But when I hit, POST FX, The audio goes silent, I’m not getting the audio from the before signal. It must be a routing error, But I am trying to follow your instructions
I hope you could help
Hard to tell without more info. Some things to check:
– Are there (at least) 4 channels in the monitoring effect path? You open the Plug-in pin connector window by pressing the “X in X out” button at the top of the plugin window.
– Are you sending the “before” signal to the hardware outputs 3-4? Note that if your audio interface has more than 2 output channels you might not see any additional channels. Just use the third and fourth channel in that case.
Routing in Reaper is very flexible, but that unfortunately also makes it a bit complex… 🙂
Hi, thank you for the replay,
Yes got 4 pins
My interface Is a Prism Lyra2, So yes It had more ins and outs.
I’m sending it to Output 3-4 but now only getting the same signal playing in both “before & After”
Grrrrr
Hang in there! You’ll figure it out! 🙂
Make sure that the mastered signal only gets sent to outputs 1-2, and that the original mix is only sent to outputs 3-4.
Is the “Master send” ticked in the routing window on any track that shouldn’t be routed to the master?
Is the Master track (View -> Master Track) set to more than 2 channels for some reason? If so, what is happening on channels 3-4?
Hope you solve it, let me know how it turns out!
Hey, Thomas, Sorry for the delay in responding to you, Its been mad hectic in the studio on my end and I’ve not had 10mins to have a mess with this.
Ok so, I’ve figured out what the issue is here,
AS I’m using “Take FX” for my processing I’m just getting the same (pre-post fx)
BUT!!!!
when I insert plugins/outboard into the mixer Your Plugins Pre-Post FX works as it should,
So, My next question is, How would I make this work when using Take FX as my processing on each track. ???
My only thoughts would be that I need to Add a duplicate channel and assign this to outputs 3/4 ???
i hope you can help
Yes, when using Take FX the simplest solution is to keep a copy of the unprocessed mix on a separate track that is routed to outputs 3-4. That’s what I do. 🙂
ok, Ill give this s shot,
Thank you so much for your help 🙂
Hi Thomas I hope all is well.
Wow. I’m loving your plugin for A/B’ing far better than any Others on the market.
I have another question though.
Is there a way to send the “before” to say channel 5/6??
The issue I’m having is that my analog outbaord goes out of 3/4 on my Prism lyra2 and I can’t do a before and after while going out to my analog signal path..
The AB plugin only let’s you select “source or output 3/4”
Unless there’s another way of doing this please let me know
Dean
Hi Dean! Great that you like the plugin! Main credit goes to TBProAudio though, I’ve just tweaked it. 🙂
Sure, just add channels to the monitoring chain and route 5-6 to input 3-4 of the plugin in the Plugin pin connector window.
Hope it helps!
/T
I’m trying the JSFX one but can’t seem to get it to work well. I put some exaggerated EQ on, and the AB plugin does detect that it’s louder and so consequently lowers the output by around 3db. But that’s nowhere near enough. The post-fx output is still noticeably louder than the pre-fx. Am I using it wrong? I thought that no matter what you do in between the source and control plugs, it should always be the same output volume?
Hi Jim,
I don’t know what might be wrong and hopefully you got it working eventually. We made a Reaper configuration with all of this already set up, maybe that would be of help otherwise.
/T